In Archlinux, the initial ramdisk which contains kernel modules needed for booting the system is generated by a bash script named mkinitcpio. In /etc/mkinitcpio.conf you specify which kernel modules you need at boot and then you build the initrd image (which Archlinux calls initramfs-linux.img) with mkinitcpio -p linux
mkinitcpio will work OOTB for most standard configurations, i.e. root partition in a regular, non-LVM partition, no encrypted partitions, etc. But in my case, I use LVM2 partitions for my root, home, var and other system partitions with only /boot being a regular partition. In addition, these LVM2 partitions are stored inside of a LUKS encrypted container. The initramfs-linux.img created by default mkinitcpio settings cannot handle such things as encrypted partitions and root partitions located inside LVM2 partitions, so you must customize mkinitcpio.conf accordingly.
mkinitcpio.conf settings for root partition located inside of LVM2 in LUKS (using sd-encrypt hook)
Inside /etc/mkinitcpio.conf locate the line starting with HOOKS=
The default settings as of Dec. 31, 2016 should look something like:
HOOKS="base udev autodetect modconf block filesystems keyboard fsck"
You should edit this line so it looks like:
HOOKS="base systemd sd-encrypt autodetect modconf block sd-lvm2 filesystems keyboard fsck"
Instead of the udev module, you will use systemd, and LUKS partitions will be handled by systemd's sd-encrypt module. Also notice there is a LVM2 kernel module present, but this module is the systemd version sd-lvm2.
Once you have edited mkinitcpio.conf, generate your initial ramdisk with mkinitcpio -p linux
The next step is to add kernel boot options to GRUB (for BIOS machines) or systemd-bootctl (for UEFI machines).
Kernel boot options for sd-encrypt and sd-lvm2 in /etc/default/grub (BIOS)
If you have an older computer that doesn't have UEFI firmware but uses BIOS, Archlinux uses GRUB to boot your system. You have to edit /etc/default/grub with the appropriate options for sd-encrypt and then regenerate your grub configuration in /boot/grub/grub.cfg
Find the line GRUB_CMDLINE_LINUX_DEFAULT= and edit it as follows:
GRUB_CMDLINE_LINUX_DEFAULT="luks.uuid=72369889-3971-4039-ab17-f4db45aeeef2 root=UUID=f4dbfa30-35ba-4d5e-8d43-a7b29652f575 rw"
Note that the luks.uuid is the UUID for your LUKS encrypted partition BEFORE it has been opened with cryptsetup open
You can find the UUID for all partitions with blkid
root=UUID= refers to the UUID of your root partition which resides inside of a LVM partition which itself is inside of a LUKS encrypted container.
If you haven't written the GRUB bootloader to your disk yet, you would then execute:
grub-install --recheck /dev/sda
(assuming sda is the HDD from which you will boot)
And then (re)generate your grub.cfg:
grub-mkconfig -o /boot/grub/grub.cfg
Kernel boot options for sd-encrypt and sd-lvm2 in /boot/loader/entries/arch.conf
Archlinux uses systemd-bootctl as the bootloader for newer machines with UEFI firmware. The main boot menu is located in /boot/loader/loader.conf which looks like:
[archjun@gl553rog loader]$ cat loader.conf
timeout 5
default arch
This particular menu contains only a single entry, but you can add entries for other Linux distros (systemd-bootctl can chainload to GRUB) and OS'es like Windows.
The OS-specific config files are stored under /boot/loader/entries/ and my arch-specific config is in /boot/loader/entries/arch.conf
title Archlinux
linux /vmlinuz-linux
initrd /intel-ucode.img
initrd /initramfs-linux.img
options luks.uuid=ba04cb93-328c-4f9a-a2a9-4a86cee0f592 luks.name=UUID=ba04cb93-328c-4f9a-a2a9-4a86cee0f592=luks root=/dev/mapper/ARCH-rootvol rw
options acpi_osi=! acpi_osi="Windows 2009"
The kernel boot options appear on the line starting with the keyword options
For luks.uuid you need to specify the UUID of your LUKS partition BEFORE it has been opened by cryptsetup. luks.name is not strictly necessary; it simply assigns an easy-to-read name to your LUKS partition. Finally, root specifies which partition your root partition is located on so that the kernel can proceed with booting. For the root parameter, you can specify the partition using /dev/mapper syntax or UUID. If you use UUID you must use the syntax root=UUID=...
After editing your arch.conf it is not necessary to rebuild any images or regenerate configs as is the case with GRUB.
Warning: Do not mix up the syntax for sd-encrypt and encrypt mkinitcpio HOOKS
Before systemd became popular, the initial ramdisk for Archlinux used busybox. When booting from an encrypted root and LVM2 with busybox, the mkinitcpio HOOKS used are encrypt and lvm2 (as opposed to sd-encrypt and sd-lvm2 for systemd)
An /etc/mkinitcpio.conf customized for LUKS and LVM2 (without systemd) would look like:
HOOKS="base udev encrypt autodetect modconf block lvm2 filesystems keyboard fsck"
Notice that the encrypt hook comes just after udev. If you were using systemd boot, however, udev would be replaced by systemd.
The related settings in /etc/default/grub (BIOS) or /boot/loader/entries/arch.conf (UEFI) would then look something like the following:
/etc/default/grub
GRUB_CMDLINE_LINUX_DEFAULT="cryptdevice=UUID=5a2527d8-8972-43f6-a32d-2c50f734f7a9:ARCH root=/dev/mapper/ARCH-rootvol"
/boot/loader/entries/arch.conf
title Arch
linux /vmlinuz-linux
initrd /intel-ucode.img
initrd /initramfs-linux.img
options cryptdevice=UUID=f121bc44-c8c2-4881-b9d5-da4d1b49f3e4:ARCH root=/dev/mapper/ARCH-rootvol rw
The keyword cryptdevice will only work with the encrypt module in your initial ramdisk. If you are using sd-encrypt, however, you must replace cryptdevice=UUID= with luks.uuid=
References:
https://wiki.archlinux.org/index.php/Dm-crypt/System_configuration#mkinitcpio

고추먹고 맴맴
2016년 12월 31일 토요일
2016년 12월 17일 토요일
Mirroring PyPI locally
I recently had to set up a local PyPI (Python Package Index) mirror at a client site so that developers could download pip packages locally instead of from the Internet. I used bandersnatch to mirror the packages hosted on PyPI. Bandersnatch can be installed via pip and mirroring requires just two steps.
Customize /etc/bandersnatch.conf
The first time you run bandersnatch, /etc/bandersnatch.conf will be automatically generated:
[root@ospctrl1 Documents]# bandersnatch
2017-06-28 16:05:11,761 WARNING: Config file '/etc/bandersnatch.conf' missing, creating default config.
2017-06-28 16:05:11,761 WARNING: Please review the config file, then run 'bandersnatch' again.
In this file you will specify the path into which you will download PyPI packages. I set my download path as follows:
[mirror]
; The directory where the mirror data will be stored.
directory = /MIRROR/pypi
By default, a logfile is specified, but bandersnatch will crash with the error ConfigParser.NoSectionError: No section: 'formatters' if the logfile does not exist. I simply commented out the line to fix this problem:
;log-config = /etc/bandersnatch-log.conf
You can see a sample bandersnatch.conf file at this pastebin:
http://paste.openstack.org/show/586323/
Start the mirroring process
You can start mirroring PyPI with the following command:
sudo bandersnatch mirror
As of Oct. 2016, PyPI takes up 380 GB on disk. Although mirroring requires just two steps, you are not done yet. You still have to make the packages available over your network and you must setup pip clients to use your local mirror.
Make the local mirror available over the network
Once you have mirrored pip packages, the next step is to setup an NFS share to the path where PyPI packages are mirrored or serve the mirror over HTTP using a webserver like Apache, nginx, darkhttpd, etc. I chose to go with darkhttpd because it doesn't require any setup whatsoever. You simply invoke darkhttpd in the path you wish to share over http. If you invoke it as sudo, it will serve files over port 80, but if you invoke it as the regular user, it will serve files over port 8080. You can specify the TCP port used with the --port option.
sudo darkhttpd /MIRROR
Now the Document Root for the webserver is /MIRROR under which the pypi folder is located. I generally place all my local mirrors (i.e. Ubuntu 16.04 repo, CentOS 7 repo, RHEL repo, etc) under the Document Root so that they are all available over http.
Assuming your local mirror machine has the IP address 10.10.10.5, if you navigate to http://10.10.10.5 in your browser (or with cURL) you should be able to see the pypi folder.
Customize pip clients to use local PyPI mirror
On client machines, create the directory ~/.pip and then create ~/.pip/pip.conf (if it doesn't exist already). Now add the following:
[global]
index-url = http://10.10.10.5/pypi/web/simple
trusted-host = 10.10.10.5
This of course assumes that clients are on the 10.10.10.x subnet and that your PyPI mirror is located on 10.10.10.5
In addition, the web server's document root should be /MIRROR as detailed in the previous section.
2016년 12월 10일 토요일
How to create a mirror of the entire npm index including attachments using npm-fullfat-registry fullfat.js
In a previous post I attempted to create a local npm mirror by simply caching all packages I installed using npm install pkgname. Unfortunately, this approach is very slow, downloading only about 100 MB per hour. Considering that all the packages in npm take up more than 1.2 TB, this speed won't do. The recommended method for creating a local npm mirror is to use the nosql couchdb. In this method, packages from npm are stored directly in couchdb.
Step One
Install couchdb from your distro's package manager or download from the Apache CouchDB page and build from source. As of Dec 10, 2016 version 1.6 is available from the Fedora 24 official repos while version 2.0+ is available from the Archlinux repos.
Once couchdb is installed, start the couchdb service. On Fedora 24+ and Archlinux, you can do this with:
sudo systemctl start couchdb
Step Two
Access Fauxton, the web GUI for couchdb by navigating to:
http://localhost:5984/_utils
Follow the prompts to create an admin user and password. If you don't create an admin user, anyone connecting to localhost:5984 will be able to create and delete databases. Also create a new database by clicking on the gear icon at the top-left. The screenshot below shows the Fauxton UI for couchdb 1.6:

Step Three
Make sure that npm (nodejs package manager) is installed and then create a new directory into which you will install the npm package npm-fullfat-registry. Then from that directory, run as local user:
npm install npm-fullfat-registry
You will then find a sub-directory named node_modules and below that npm-fullfat-registry/bin.
cd node_modules/npm-fullfat-registry/bin
In this sub-directory you will find a single file named fullfat.js
This is the program you need to execute in order to create a local npm mirror, assuming you have already installed couchdb and have created a DB for this program to write to.
fullfat.js takes the following arguments:
-f or --fat : the url to the couchdb database for storing packages
-s or --skim : the url to the npm package index
--seq-file : file which keeps track of the current package being downloaded from npm
--missing-log : file which stores the names and sequence numbers of packages that cannot be found
To save myself the hassle of entering these parameters every time I want to invoke fullfat.js, I created a convenience script in Bash:
#!/bin/bash
# fullfat.sh
# Last Updated: 2016-11-08
# Jun Go
# Invokes fullfat.js for creating a local npm mirror containing
# npm index as well as attachments. This script is intended to
# be launched by 'npm-fullfat-helper.sh'
LOCALDB=http://user:pw@localhost:5984/registry
SKIMDB=https://skimdb.npmjs.com/registry
./fullfat.js -f $LOCALDB -s $SKIMDB --seq-file=registry.seq \
--missing-log=missing.log
Of course you will need to edit the username and password for accessing Fauxton. The script above works, but it is not sufficient. fullfat.js crashes every so often so I created a monitor script to restart my fullfat.sh wrapper script whenever fullfat.js crashes. My monitor script is named npm-fullfat-helper.sh:
#!/bin/bash
# npm-fullfat-helper.sh
# Last Updated: 2016-11-08
# Jun Go
# During the mirroring process for npm, binary file attachments
# are saved into a local couchdb DB named 'registry', but sometimes
# downloading some packages fails or times out, which stops the
# entire process. If you manually resume with fullfat.js, you can
# start again where you left off. This script removes the need to
# do this manually.
until ./fullfat.sh; do
printf "%s\n" "fullfat.js crashed with exit code $?. Respawning" >&2
sleep 1
done
Using the script above, mirroring npm with fullfat.js becomes much more robust as it will be re-launched if the process returns anything other than exit code 0. But this is still not sufficient, because sometimes fullfat.js gets stuck while trying to download certain packages. No matter how many times it is restarted, certain packages (especially those with dozens of versions) never complete downloading, so you will be left with a lot of tar.gz files in temp directories but no final PUT command to couchdb. When this happens you have to manually edit the sequence file (which keeps track of which package is currently being downloaded). For example, if fullfat.js is stuck and registry.seq contains the number 864117, you must increment the number by 1 to 864117. Then if you relaunch the monitor script, fullfat.js should go on to the next package. If the package name is still unchanged, edit registry.seq once more by incrementing the new sequence by one.
Conclusion
Mirroring the npm index with file attachments using couchdb is much faster than simply caching packages installed through npm install foo. I get speeds of about 1 GB/hr. The problem is that manual intervention is required when fullfat.js gets stuck, i.e. you must manually change the sequence number stored in the sequence file (which I called registry.seq above) so that fullfat.js will skip a problematic package and go on to the next one. Another inconvenience is that as of Dec 12, 2016 the documentation for npm-fullfat-registry has not been updated. If you follow along with these old instructions, you will be told to invoke the following:
npm-fullfat-registry -f [url to local db] -s [url to npm package index]
But this won't work because the program you need to actually execute is fullfat.js. Simply replace npm-fullfat-registry above with fullfat.js and you'll be good to go. Keep in mind that the path to fullfat.js is node_modules/npm-fullfat-registry/bin in the directory into which you invoked npm install npm-fullfat-registry.
Step One
Install couchdb from your distro's package manager or download from the Apache CouchDB page and build from source. As of Dec 10, 2016 version 1.6 is available from the Fedora 24 official repos while version 2.0+ is available from the Archlinux repos.
Once couchdb is installed, start the couchdb service. On Fedora 24+ and Archlinux, you can do this with:
sudo systemctl start couchdb
Step Two
Access Fauxton, the web GUI for couchdb by navigating to:
http://localhost:5984/_utils
Follow the prompts to create an admin user and password. If you don't create an admin user, anyone connecting to localhost:5984 will be able to create and delete databases. Also create a new database by clicking on the gear icon at the top-left. The screenshot below shows the Fauxton UI for couchdb 1.6:

Make sure that npm (nodejs package manager) is installed and then create a new directory into which you will install the npm package npm-fullfat-registry. Then from that directory, run as local user:
npm install npm-fullfat-registry
You will then find a sub-directory named node_modules and below that npm-fullfat-registry/bin.
cd node_modules/npm-fullfat-registry/bin
In this sub-directory you will find a single file named fullfat.js
This is the program you need to execute in order to create a local npm mirror, assuming you have already installed couchdb and have created a DB for this program to write to.
fullfat.js takes the following arguments:
-f or --fat : the url to the couchdb database for storing packages
-s or --skim : the url to the npm package index
--seq-file : file which keeps track of the current package being downloaded from npm
--missing-log : file which stores the names and sequence numbers of packages that cannot be found
To save myself the hassle of entering these parameters every time I want to invoke fullfat.js, I created a convenience script in Bash:
#!/bin/bash
# fullfat.sh
# Last Updated: 2016-11-08
# Jun Go
# Invokes fullfat.js for creating a local npm mirror containing
# npm index as well as attachments. This script is intended to
# be launched by 'npm-fullfat-helper.sh'
LOCALDB=http://user:pw@localhost:5984/registry
SKIMDB=https://skimdb.npmjs.com/registry
./fullfat.js -f $LOCALDB -s $SKIMDB --seq-file=registry.seq \
--missing-log=missing.log
Of course you will need to edit the username and password for accessing Fauxton. The script above works, but it is not sufficient. fullfat.js crashes every so often so I created a monitor script to restart my fullfat.sh wrapper script whenever fullfat.js crashes. My monitor script is named npm-fullfat-helper.sh:
#!/bin/bash
# npm-fullfat-helper.sh
# Last Updated: 2016-11-08
# Jun Go
# During the mirroring process for npm, binary file attachments
# are saved into a local couchdb DB named 'registry', but sometimes
# downloading some packages fails or times out, which stops the
# entire process. If you manually resume with fullfat.js, you can
# start again where you left off. This script removes the need to
# do this manually.
until ./fullfat.sh; do
printf "%s\n" "fullfat.js crashed with exit code $?. Respawning" >&2
sleep 1
done
Using the script above, mirroring npm with fullfat.js becomes much more robust as it will be re-launched if the process returns anything other than exit code 0. But this is still not sufficient, because sometimes fullfat.js gets stuck while trying to download certain packages. No matter how many times it is restarted, certain packages (especially those with dozens of versions) never complete downloading, so you will be left with a lot of tar.gz files in temp directories but no final PUT command to couchdb. When this happens you have to manually edit the sequence file (which keeps track of which package is currently being downloaded). For example, if fullfat.js is stuck and registry.seq contains the number 864117, you must increment the number by 1 to 864117. Then if you relaunch the monitor script, fullfat.js should go on to the next package. If the package name is still unchanged, edit registry.seq once more by incrementing the new sequence by one.
Conclusion
Mirroring the npm index with file attachments using couchdb is much faster than simply caching packages installed through npm install foo. I get speeds of about 1 GB/hr. The problem is that manual intervention is required when fullfat.js gets stuck, i.e. you must manually change the sequence number stored in the sequence file (which I called registry.seq above) so that fullfat.js will skip a problematic package and go on to the next one. Another inconvenience is that as of Dec 12, 2016 the documentation for npm-fullfat-registry has not been updated. If you follow along with these old instructions, you will be told to invoke the following:
npm-fullfat-registry -f [url to local db] -s [url to npm package index]
But this won't work because the program you need to actually execute is fullfat.js. Simply replace npm-fullfat-registry above with fullfat.js and you'll be good to go. Keep in mind that the path to fullfat.js is node_modules/npm-fullfat-registry/bin in the directory into which you invoked npm install npm-fullfat-registry.
2016년 12월 1일 목요일
Using an external monitor with bumblebee and intel-virtual-output
I have an ASUS U36JC which uses both Intel integrated video and an Nvidia GeForce 310M GPU. On Windows, Nvidia has a solution called Optimus that will automatically switch between the Intel and Nvidia GPU's depending on the computing task. For example, when you are editing a document, the notebook will use the low-power integrated Intel GPU and when you are watching a movie or doing video editing, the notebook will use the power-hungry Nvidia GPU.
On Linux, however, this GPU-switching does not happen automatically. There are several different ways you can enable Nvidia GPU's on Linux, but I chose bumblebee-nvidia with the proprietary Nvidia driver as I explain in a previous post. To launch regular applications using the Nvidia GPU, you must launch your program by prefixing it with 'optirun', i.e.:
optirun [program name]
But in order to use multiple monitors on an Optimus-enabled notebook like the ASUS U36JC, you can't just invoke something like optirun startx. You need to edit a few Bumblebee X11 settings and make sure that bumblebeed (bumblebee daemon) is running to use the HDMI external monitor port (which is hard-wired to the discrete Nvidia GPU. The VGA port on the ASUS U36JC uses Intel integrated graphics, however, so bumblee is not required)
The required steps to use an external monitor through the HDMI port on Fedora 24 are as follows:
1. Make sure you have already installed and configured bumblebee.
2. sudo dnf install intel-gpu-tools (this pkg contains intel-virtual-output)
3. In /etc/bumblebee/xorg.conf.nvidia make the following changes:
4. Start bumblebee daemon: sudo systemctl start bumblebeed
5. Launch intel-virtual-output (the default is to launch as a daemon, but I will launch in foreground mode so I can easily kill the process with Ctrl-C when I am done using an external monitor). You can run this program as the local user (When executing as root, it doesn't work).
# intel-virtual-output -f
Now X windows should be able to detect an external monitor connected to the video ports wired to the Nvidia GPU. Running xfce4-display-settings shows the following:
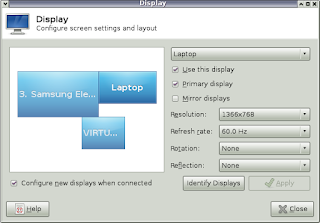
The monitor named "VIRTUAL" is a path-through interface created by intel-virtual-output.
Arandr, the front-end to the Xorg screen layout/orientation tool xrandr, also detects multiple screens:

References:
https://wiki.archlinux.org/index.php/bumblebee#Output_wired_to_the_NVIDIA_chip
https://bugzilla.redhat.com/show_bug.cgi?id=1195962
On Linux, however, this GPU-switching does not happen automatically. There are several different ways you can enable Nvidia GPU's on Linux, but I chose bumblebee-nvidia with the proprietary Nvidia driver as I explain in a previous post. To launch regular applications using the Nvidia GPU, you must launch your program by prefixing it with 'optirun', i.e.:
optirun [program name]
But in order to use multiple monitors on an Optimus-enabled notebook like the ASUS U36JC, you can't just invoke something like optirun startx. You need to edit a few Bumblebee X11 settings and make sure that bumblebeed (bumblebee daemon) is running to use the HDMI external monitor port (which is hard-wired to the discrete Nvidia GPU. The VGA port on the ASUS U36JC uses Intel integrated graphics, however, so bumblee is not required)
The required steps to use an external monitor through the HDMI port on Fedora 24 are as follows:
1. Make sure you have already installed and configured bumblebee.
2. sudo dnf install intel-gpu-tools (this pkg contains intel-virtual-output)
3. In /etc/bumblebee/xorg.conf.nvidia make the following changes:
- Option "AutoAddDevices" "true"
- Option "UseEDID" "true"
- # Option "UseDisplayDevice" "none"
You can see my edited xorg.conf.nvidia file here:
4. Start bumblebee daemon: sudo systemctl start bumblebeed
5. Launch intel-virtual-output (the default is to launch as a daemon, but I will launch in foreground mode so I can easily kill the process with Ctrl-C when I am done using an external monitor). You can run this program as the local user (When executing as root, it doesn't work).
# intel-virtual-output -f
Now X windows should be able to detect an external monitor connected to the video ports wired to the Nvidia GPU. Running xfce4-display-settings shows the following:

The monitor named "VIRTUAL" is a path-through interface created by intel-virtual-output.
Arandr, the front-end to the Xorg screen layout/orientation tool xrandr, also detects multiple screens:

References:
https://wiki.archlinux.org/index.php/bumblebee#Output_wired_to_the_NVIDIA_chip
https://bugzilla.redhat.com/show_bug.cgi?id=1195962
2016년 11월 12일 토요일
Installing Nvidia driver for GeForce 310m on Fedora 24 with bumblebee-nvidia
My Asus U36JC notebook contains both Intel integrated graphics and an Nvidia GeForce 310M. Here are the results from lspci:
00:02.0 VGA compatible controller: Intel Corporation Core Processor Integrated Graphics Controller (rev 18)
...
01:00.0 VGA compatible controller: NVIDIA Corporation GT218M [GeForce 310M] (rev ff)
This notebook supports Nvidia's Optimus, which switches between integrated Intel video and the discrete Nvidia card depending on the computing task. For 3D-intensive workloads, the Nvidia card should be used. While this works OOTB on Windows 7+, on Linux you must do the switching manually. One project that makes this possible is Bumblebee. When you want to launch a certain program with the discrete Nvidia card, you simply prefix the program launch command with optirun.
I tried the open-source nouveau driver for my Nvidia GeForce 310M but I found the frame rate lacking when playing games so I switched to using Nvidia's proprietary driver. When you are searching for the Nvidia Linux driver for an older video card, DO NOT go to the main page for your video card and download drivers from there; if you do that, you will only be able to find old drivers for Linux kernel 2.4.X and 2.6.X, and these drivers are incompatible with Fedora 24 (which as of Nov. 13, 2016 is at 4.8.6.-201.fc24.x86_64)
Instead, to download the newest proprietary Nvidia Linux driver blobs, you must go to the following link and find your card:
http://www.nvidia.com/object/IO_32667.html
Then you can download the appropriate driver from the following link:
http://www.nvidia.com/object/unix.html
For my Nvidia GeForce 310M, the latest proprietary driver as of Nov. 13, 2016 is NVIDIA-Linux-x86_64-340.98 which can be downloaded from here:
http://www.nvidia.com/Download/driverResults.aspx/107868/en-us
Now it's time to install Bumblebee. I added the following repos for Bumblebee with Nvidia closed-source driver and unmanaged Nvidia Fedora repo:
dnf -y --nogpgcheck install http://install.linux.ncsu.edu/pub/yum/itecs/public/bumblebee/fedora24/noarch/bumblebee-release-1.2-1.noarch.rpm
dnf -y --nogpgcheck install http://install.linux.ncsu.edu/pub/yum/itecs/public/bumblebee-nonfree-unmanaged/fedora24/noarch/bumblebee-nonfree-unmanaged-release-1.2-1.noarch.rpm
I then installed the following:
dnf install bumblebee-nvidia bbswitch-dkms VirtualGL.x86_64 VirtualGL.i686 primus.x86_64 primus.i686 kernel-devel
Now copy the Nvidia binary blob which you downloaded earlier (it has the extension .run) into /etc/sysconfig/nvidia and then execute the following:
$ sudo bumblebee-nvidia --debug
[sudo] password for fedjun:
--debug mode selected.
Building NVIDIA video drivers: Creating directory NVIDIA-Linux-x86_64-340.98
Verifying archive integrity... OK
Uncompressing NVIDIA Accelerated Graphics Driver for Linux-x86_64 340.98.................................................................................................................................................................................................................................
[ OK ]
You may be prompted to manually build bbswitch using DKMS during the installation. Note you will have to manually rebuild your Nvidia driver using the above command every time your kernel is upgraded. Once you build the driver, you may have to restart your machine to get bumblebeed to work.
Now make sure bumblebeed is running:
[fedjun@u36jcFedora nvidia]$ systemctl status bumblebeed
● bumblebeed.service - Bumblebee C Daemon
Loaded: loaded (/usr/lib/systemd/system/bumblebeed.service; enabled; vendor preset: disabled)
Active: active (running) since Sat 2016-11-12 09:21:47 KST; 24s ago
Main PID: 20004 (bumblebeed)
Tasks: 1 (limit: 512)
CGroup: /system.slice/bumblebeed.service
└─20004 /usr/sbin/bumblebeed
Nov 12 09:21:47 u36jcFedora systemd[1]: Started Bumblebee C Daemon.
Nov 12 09:21:47 u36jcFedora bumblebeed[20004]: [ 2077.225663] [INFO]/usr/sbin/bumblebeed 3.2.1 started
Finally, test that glxgears runs with your Nvidia card:
$ optirun glxgears
You should see an OpenGL window appear with 3 rotating gears. Press ESC to exit the window.
When I play Pillars of Eternity 3.03, I launch the game as follows:
$ optirun ./start.sh
I get much better frame rates when using the Nvidia discrete video card with this game.
References:
https://fedoraproject.org/wiki/Bumblebee
https://github.com/Bumblebee-Project/Bumblebee/issues/814
2016년 10월 29일 토요일
Slow transfer times when creating a local npm package mirror
In the current project I'm working on, the client wants developers to install packages from local mirrors of Ubuntu, PyPI, and npm. Creating local mirrors of Ubuntu default repositories is easy with apt-mirror, and PyPI can also be mirrored easily with Bandersnatch. Mirroring the npm repo, however, is not so easy. I followed guides which recommend creating a mirror with CouchDB, but I couldn't get this method to work. Instead, I set up Sinopia as an npm cache server so that every time I install an npm package locally it is also saved in Sinopia. The next time I try to install the same package, it will be installed from the Sinopia cache instead of from the npm site.
The problem with using Sinopia as a full npm mirror is that it will not automatically download packages. You must manually install npm packages with npm install pkgname. I got a list of all the packages in npm from http://skimdb.npmjs.com/registry/_all_docs and then parsed the file to get only package names. I then wrote the following script to download packages from npm (which will then be stored in Sinopia):
As of October 2016 when I mirrored PyPI using Bandersnatch, downloading 380GB took about 1.5 days on a 500 Mbit/s connection. Mirroring Ubuntu 14.04 and 16.04 repos requires 300GB each and takes almost one day for each. But using my bash script, I am only getting speeds of about 100MB per hour. Considering that npm is currently 1.2 TB in size, it would take me over 1200 days to create a complete npm mirror at the current download speed. Why is npm so slow compared to Ubuntu repos and PyPI?
2016년 10월 22일 토요일
Adding nodes to Openstack Mitaka with Packstack
In my initial Openstack Mitaka deployment on four Fujitsu servers, I used a customized answer file specifying Neutron OVS bridge interfaces and the slave interfaces for bridges. The relevant setting in the answer file is:
CONFIG_NEUTRON_OVS_BRIDGE_IFACES=br-ex:eno1,br-eno2:eno2
However, I want to add 2 additional compute nodes which are a different kind of server, namely IBM. The interfaces are named differently, so the slave interfaces for br-ex and br-eno2 will be different.
I copied my original answer file and renamed it mitaka-ibm.cfg
Inside this answer file, I simply edited the field
CONFIG_COMPUTE_HOSTS=10.10.10.6,10.10.10.7
and added the mgmt network IP's for the two new compute hosts and removed the IP's for the existing compute nodes.
I then edited
CONFIG_NEUTRON_OVS_BRIDGE_IFACES=br-ex:enp1s0,br-eno2:enp2s0
to change the slave interface names for the bridge interfaces on the 2 IBM servers.
Since I don't want Packstack to overwrite the config on existing Openstack nodes, I also added the mgmt network IP's as well as external network IP for Horizon to the following field:
EXCLUDE_SERVERS=10.10.10.2,10.10.10.3,10.10.10.4,10.10.10.5,192.168.4.51
However, the field
CONFIG_CONTROLLER_HOST=192.168.4.51
must be filled in with the external IP of the control node, otherwise the installation will fail when running the puppet file nova.pp
References:
https://www.rdoproject.org/install/adding-a-compute-node/
CONFIG_NEUTRON_OVS_BRIDGE_IFACES=br-ex:eno1,br-eno2:eno2
However, I want to add 2 additional compute nodes which are a different kind of server, namely IBM. The interfaces are named differently, so the slave interfaces for br-ex and br-eno2 will be different.
I copied my original answer file and renamed it mitaka-ibm.cfg
Inside this answer file, I simply edited the field
CONFIG_COMPUTE_HOSTS=10.10.10.6,10.10.10.7
and added the mgmt network IP's for the two new compute hosts and removed the IP's for the existing compute nodes.
I then edited
CONFIG_NEUTRON_OVS_BRIDGE_IFACES=br-ex:enp1s0,br-eno2:enp2s0
Since I don't want Packstack to overwrite the config on existing Openstack nodes, I also added the mgmt network IP's as well as external network IP for Horizon to the following field:
EXCLUDE_SERVERS=10.10.10.2,10.10.10.3,10.10.10.4,10.10.10.5,192.168.4.51
However, the field
CONFIG_CONTROLLER_HOST=192.168.4.51
must be filled in with the external IP of the control node, otherwise the installation will fail when running the puppet file nova.pp
References:
https://www.rdoproject.org/install/adding-a-compute-node/
2016년 10월 15일 토요일
Boot Information Negotiation Layer (BINL) UDP 4011 must be opened for PXE
I wrote a script that opens ports in the firewalld dynamic firewall so I can run a PXE server, but I neglected to add one port -- UDP 4011 for the Boot Information Negotiation Layer. Once the kernel and initrd are sent by TFTP, I use http to send installation files from a mounted iso.
The ports I open are as follows:
UDP 69 (TFTP)
UDP 4011 (BINL)
UDP 67, 68 (DHCP)
TCP 5500 (VNC)
In the script I don't pass all port names explicitly; some can simply be passed as service names to firewall-cmd, which figures out which port numbers to open.
References:
http://www.configmgr.no/2012/03/21/ports-used-by-pxeosd/
2016년 10월 8일 토요일
Install Archlinux over UEFI PXE from an existing PXE server
When installing Linux over UEFI PXE, GRUB2 grub.cfg is used as the PXE image menu. Archlinux has some idiosyncratic PXE options which I will detail in this post.
First, download the latest Archlinux installation iso from the following link:
Mount the iso and note the following paths in the mounted image:
/arch/boot/x86_64
contains the linux kernel and initrd image for 64-bit
- kernel: vmlinuz
- initrd: archiso.img
/arch/boot
contains intel microcode and memtest
- intel_ucode.img
- memtest
In most other Linux distros, the initrd image on installation iso's is named initrd.img but Archlinux uses archiso.img
The Archlinux-specific Kernel boot parameters for PXE are as follows:
- archisobaseddir=arch Specifies the root directory of the installation iso
- archiso_http_srv=http://ip.ad.d.r:port/ Specifies installation file location over http (you can also use nbd and nfs instead of http)
- ip=:::::eth0:dhcp Tells the Arch kernel to bring up the network iface (on the machine to be installed with Arch) and get an IP address via DHCP. For predictability, the network iface in the Arch chroot environment is always named eth0
Keep in mind that eth0 is just a temporary name for your wired iface during installation. Once installation is complete and you exit the Arch install chroot and restart, your wired interface will come up with a systemd-style network device name.
My grub.cfg for UEFI PXE can be seen here:
The menu entry in grub.cfg for Archlinux UEFI should look like this if you are installing over http:
menuentry 'Archlinux iso 2016.09.03' --class arch --class gnu-linux --class gnu --class os {
echo 'Loading kernel vmlinuz from installation ISO...'
linuxefi images/archlinux/vmlinuz archisobaseddir=arch archiso_http_srv=http://192.168.95.97:8080/ ip=:::::eth0:dhcp
echo 'Loading initial ramdisk ...'
initrdefi images/archlinux/intel_ucode.img images/archlinux/archiso.img
}
For information on how to setup a PXE server that can install to both UEFI and Legacy BIOS machines, refer to my previous post on this topic:
If you don't have UEFI hardware lying around for testing, you can use KVM with OVMF Tianocore UEFI. I detail how to get started in the following post:
2016년 9월 30일 금요일
Openstack Mitaka - Changing ceilometer default polling period in pipeline.yaml
I am currently working on a four-node installation of Openstack Mitaka and while testing Ceilometer alarm functionality, I ran into the problem of the alarm state always displaying insufficient data. Of the four nodes, mgmt01 is the storage node running glance and cinder, mgmt02 is the control node running nova-manager, keystone, ceilometer, heat, horizon, etc., and two compute nodes, compute01 and compute02.
By default, Ceilometer telemetry gathers data every 600 seconds, but you can change interval: 600 (in seconds) to some smaller value. Here's a link to the default version of /etc/ceilometer/pipeline.yaml for Openstack Mitaka:
https://gist.github.com/gojun077/8d7b9e8afc22c8f5d5014c883f8c1cf9
On my control node, mgmt02, I made sure to edit this file so that ceilometer would poll gauges every 60 seconds by using interval: 60 in several places throughout the file.
Next I created a new Cirros VM named cirros-test-meter with only an internal network interface:
# openstack server create --image cirros-d160722-x86_64 \
--flavor m1.tiny \
--nic net-id=bc7730ce-80e8-47e1-96e5-c4103ed8e37c cirros-test-meter
To get the UUID of cirros-test-meter:
# openstack server list
...
f3280890-1b60-4a6c-8df5-7195dbb00ca3 | cirros-test-meter | ACTIVE | private=192.168.95.142
I then created a ceilometer alarm for the cirros vm that would track cpu usage (using ceilometer gauge cpu_util) and trigger an alarm if cpu utilization went above 70% for more than two consecutive 60 second periods.
# ceilometer alarm-threshold-create --name cpu_high \
--description 'CPU usage high' --meter-name cpu_util \
--threshold 70 --comparison-operator gt --statistic avg \
--period 60 --evaluation-periods 2 --alarm-action 'log://' \
--query resource_id=f3280890-1b60-4a6c-8df5-7195dbb00ca3
Note that since Openstack Liberty, the alarm-action 'log://' will log alarms to /var/log/aodh/notifications.log instead of to /var/log/ceilometer/alarm-notifier.log so don't go looking for alarm logs in the wrong path!
Verify that the alarm cpu_high was created:
# ceilometer alarm-list
...
| Alarm ID | Name | State | Severity | Enabled | Continuous | Alarm condition | Time constraints |
+--------------------------------------+----------+-------------------+----------+---------+------------+-------------------------------------+------------------+
| 23651a53-19cf-4bb0-97e0-09fab14445cd | cpu_high | insufficient data | low | True | False | avg(cpu_util) > 70.0 during 2 x 60s | None |
Since the alarm was just created, I will have to wait at least two 60 sec periods before the alarm has enough data.
I create high cpu load inside the cirros vm with the following while loop:
while [ 1 ] ; do
echo $((13**99)) 1>/dev/null 2>&1
done &
This calculates 13 to the 99th power in an infinite loop. You can later kill this process by running top, finding the PID of the /bin/sh process running the above shell command, and killing it with sudo kill -15 PID.
This will immediately start generating 100% cpu load.
Just to make sure, let's see what meters are available for the cirros vm:
# ceilometer meter-list --query \
resource=f3280890-1b60-4a6c-8df5-7195dbb00ca3
...
| Name | Type | Unit | Resource ID | User ID | Project ID |
+--------------------------+------------+-----------+--------------------------------------+----------------------------------+----------------------------------+
| cpu | cumulative | ns | f3280890-1b60-4a6c-8df5-7195dbb00ca3 | dfb630234e4e4155871611d5e60dc1d4 | ada4ee7cb446439abbe887601c87c900 |
| cpu.delta | delta | ns | f3280890-1b60-4a6c-8df5-7195dbb00ca3 | dfb630234e4e4155871611d5e60dc1d4 | ada4ee7cb446439abbe887601c87c900 |
| cpu_util | gauge | % | f3280890-1b60-4a6c-8df5-7195dbb00ca3 | dfb630234e4e4155871611d5e60dc1d4 | ada4ee7cb446439abbe887601c87c900 |
...
You will see that the cpu_util ceilometer gauge exists for cirros-meter-test.
Several minutes passed, and so I got a list of cpu_util sample values from ceilometer:
# ceilometer sample-list --meter cpu_util --query \
resource=f3280890-1b60-4a6c-8df5-7195dbb00ca3
+--------------------------------------+----------+-------+---------------+------+----------------------------+
| Resource ID | Name | Type | Volume | Unit | Timestamp |
+--------------------------------------+----------+-------+---------------+------+----------------------------+
| f3280890-1b60-4a6c-8df5-7195dbb00ca3 | cpu_util | gauge | 102.75779497 | % | 2016-09-27T04:56:31.816000 |
| f3280890-1b60-4a6c-8df5-7195dbb00ca3 | cpu_util | gauge | 102.483886216 | % | 2016-09-27T04:46:31.852000 |
| f3280890-1b60-4a6c-8df5-7195dbb00ca3 | cpu_util | gauge | 42.2381838593 | % | 2016-09-27T04:36:31.826000 |
| f3280890-1b60-4a6c-8df5-7195dbb00ca3 | cpu_util | gauge | 4.27827845015 | % | 2016-09-27T04:26:31.942000 |
| f3280890-1b60-4a6c-8df5-7195dbb00ca3 | cpu_util | gauge | 4.42085822432 | % | 2016-09-27T04:16:31.935000 |
| f3280890-1b60-4a6c-8df5-7195dbb00ca3 | cpu_util | gauge | 4.41009081847 | % | 2016-09-27T04:06:31.825000 |
| f3280890-1b60-4a6c-8df5-7195dbb00ca3 | cpu_util | gauge | 3.69494435414 | % | 2016-09-27T03:56:31.837000 |
But something is not right. Although the latest readings for cpu_util are more than 100% (remember my alarm cpu_high should be triggered if cpu_util > 70%), you will notice that the polling interval is every 10 minutes:
2016-09-27T04:56
2016-09-27T04:46
2016-09-27T04:36
2016-09-27T04:26
2016-09-27T04:16
...
I definitely edited /etc/ceilometer/pipeline.yaml on my control node mgmt02 so that interval: 60 instead of 600 and then restarted ceilometer on the control node with openstack-service restart ceilometer
It turns out that I also have to edit /etc/ceilometer/pipeline.yaml on both of my Nova compute nodes as well! Running openstack-service status on mgmt02 I get:
[root@osmgmt02 ~(keystone_admin)]# openstack-service status
MainPID=26342 Id=neutron-dhcp-agent.service ActiveState=active
MainPID=26371 Id=neutron-l3-agent.service ActiveState=active
MainPID=26317 Id=neutron-lbaas-agent.service ActiveState=active
MainPID=26551 Id=neutron-metadata-agent.service ActiveState=active
MainPID=26299 Id=neutron-metering-agent.service ActiveState=active
MainPID=26411 Id=neutron-openvswitch-agent.service ActiveState=active
MainPID=26315 Id=neutron-server.service ActiveState=active
MainPID=26265 Id=openstack-aodh-evaluator.service ActiveState=active
MainPID=26455 Id=openstack-aodh-listener.service ActiveState=active
MainPID=26508 Id=openstack-aodh-notifier.service ActiveState=active
MainPID=19412 Id=openstack-ceilometer-central.service ActiveState=active
MainPID=19416 Id=openstack-ceilometer-collector.service ActiveState=active
MainPID=19414 Id=openstack-ceilometer-notification.service ActiveState=active
MainPID=26577 Id=openstack-gnocchi-metricd.service ActiveState=active
MainPID=26236 Id=openstack-gnocchi-statsd.service ActiveState=active
MainPID=26535 Id=openstack-heat-api.service ActiveState=active
MainPID=26861 Id=openstack-heat-engine.service ActiveState=active
(Note: I am missing heat-api-cfn.service, which is necessary for autoscaling with Heat templates)
MainPID=26781 Id=openstack-nova-api.service ActiveState=active
MainPID=26753 Id=openstack-nova-cert.service ActiveState=active
MainPID=26691 Id=openstack-nova-conductor.service ActiveState=active
MainPID=26316 Id=openstack-nova-consoleauth.service ActiveState=active
MainPID=26603 Id=openstack-nova-novncproxy.service ActiveState=active
MainPID=26702 Id=openstack-nova-scheduler.service ActiveState=active
And on both of my Nova nodes compute01, compute02 openstack-service status returns:
MainPID=845 Id=neutron-openvswitch-agent.service ActiveState=active
MainPID=812 Id=openstack-ceilometer-compute.service ActiveState=active
MainPID=822 Id=openstack-nova-compute.service ActiveState=active
The compute nodes are running Neutron OVS agent, ceilometer-compute, and nova-compute services.
Once I edit pipeline.yaml on compute01, compute02 and restart ceilometer on each Nova node, my cpu_high alarm finally gets triggered:
# ceilometer alarm-list
+--------------------------------------+----------+-------+----------+---------+------------+-------------------------------------+------------------+
| Alarm ID | Name | State | Severity | Enabled | Continuous | Alarm condition | Time constraints |
+--------------------------------------+----------+-------+----------+---------+------------+-------------------------------------+------------------+
| 23651a53-19cf-4bb0-97e0-09fab14445cd | cpu_high | alarm | low | True | False | avg(cpu_util) > 70.0 during 2 x 60s | None |
+--------------------------------------+----------+-------+----------+---------+------------+-------------------------------------+------------------+
And you can also see that the cpu_util samples are now taken at one-minute intervals:
# ceilometer sample-list --meter cpu_util --query \
resource=f3280890-1b60-4a6c-8df5-7195dbb00ca3 -l 10
+--------------------------------------+----------+-------+---------------+------+----------------------------+
| Resource ID | Name | Type | Volume | Unit | Timestamp |
+--------------------------------------+----------+-------+---------------+------+----------------------------+
| f3280890-1b60-4a6c-8df5-7195dbb00ca3 | cpu_util | gauge | 102.504582533 | % | 2016-09-27T06:45:50.867000 |
| f3280890-1b60-4a6c-8df5-7195dbb00ca3 | cpu_util | gauge | 102.478356119 | % | 2016-09-27T06:44:50.880000 |
| f3280890-1b60-4a6c-8df5-7195dbb00ca3 | cpu_util | gauge | 102.424959609 | % | 2016-09-27T06:43:50.945000 |
| f3280890-1b60-4a6c-8df5-7195dbb00ca3 | cpu_util | gauge | 102.431860726 | % | 2016-09-27T06:42:50.872000 |
| f3280890-1b60-4a6c-8df5-7195dbb00ca3 | cpu_util | gauge | 102.486230975 | % | 2016-09-27T06:41:50.881000 |
| f3280890-1b60-4a6c-8df5-7195dbb00ca3 | cpu_util | gauge | 102.458524549 | % | 2016-09-27T06:40:50.873000 |
| f3280890-1b60-4a6c-8df5-7195dbb00ca3 | cpu_util | gauge | 102.540472746 | % | 2016-09-27T06:39:50.878000 |
| f3280890-1b60-4a6c-8df5-7195dbb00ca3 | cpu_util | gauge | 102.494100804 | % | 2016-09-27T06:38:50.940000 |
| f3280890-1b60-4a6c-8df5-7195dbb00ca3 | cpu_util | gauge | 102.499692501 | % | 2016-09-27T06:37:50.869000 |
| f3280890-1b60-4a6c-8df5-7195dbb00ca3 | cpu_util | gauge | 102.415145802 | % | 2016-09-27T06:36:50.868000 |
+--------------------------------------+----------+-------+---------------+------+----------------------------+
2016년 9월 24일 토요일
Using Korean UTF8 fonts in LaTeX with koTeX
Although I am not an academic, I sometimes use LaTeX to write documents containing mathematical expressions. My resume is also formatted as a .tex document which I then export to PDF using pdflatex. One inconvenience, however, is that regular LaTeX doesn't support UTF8 characters.
When I searched the Internet for ways to add Korean fonts to .tex documents, I first came across the package texlive-langcjk which can be invoked in your document with \usepackage {CJKutf8} but it fails to correctly render Korean fonts using the pdflatex rendering engine.
I then tried the koTeX package which can be found in the default Fedora 24 repositories as texlive-kotex-* and in the default Archlinux repositories as texlive-langkorean. In your LaTeX preamble simply add
\usepackage {kotex}
and you will be able to use any UTF8 Korean fonts you have installed on your system. Note that you must use xetex instead of pdflatex as your tex to pdf rendering engine, however.


To use xetex on Fedora, you must have the texlive-xetex-bin package installed. On Archlinux, xetex can be found in the package texlive-bin. If you find that you are missing some .sty font files needed to render your LaTeX document to PDF, you will have to install those separately. For example, on Fedora I had to separately install texlive-isodate, texlive-substr, texlive-textpos, and texlive-titlesec before my resume template could render into PDF using xetex.
2016년 9월 17일 토요일
Openstack Mitaka multinode install using Packstack
I recently did a four-node install of Openstack Mitaka (RDO 9) using a pre-edited Packstack answer file. Of the four nodes, two are Nova compute nodes, one is a control node (Keystone, Horizon, Nova Controller, Neutron, etc) and one is a storage node (Glance and Cinder).
The external and internal network interfaces are br-ex and br-eno2, respectively. Before running
packstack --answer-file [name of answerfile]
you must create these interfaces manually in /etc/sysconfig/network-scripts
On my servers, I made eno1 a slave of br-ex and used an Open V-switch bridge instead of the built-in linux bridge. Here is my network config file for eno1 (ifcfg-eno1)
NAME=eno1
UUID=a5802af4-1400-4d4f-964c-2eae6e20905f
DEVICE=eno1
DEVICETYPE=ovs
ONBOOT=yes
TYPE=OVSPort
BOOTPROTO=none
OVS_BRIDGE=br-ex
And here is my network config file for br-ex (ifcfg-br-ex):
NAME=br-ex
DEVICE=br-ex
DEVICETYPE=ovs
TYPE=OVSBridge
ONBOOT=yes
BOOTPROTO=static
IPADDR=192.168.10.116
NETMASK=255.255.255.0
GATEWAY=192.168.10.1
PEERDNS=yes
DNS1=168.126.63.1
DNS2=168.126.63.2
You will also need to make similar settings for eno2 and br-eno2 (which will be used for the internal or management network). In my case the external network is on 192.168.10.x, while my internal network is on 192.168.95.x
To apply the new settings, systemctl restart network and also make sure that you stop and disable NetworkManager before running Packstack.
In the Packstack answer file, I used br-ex and br-eno2 in the following four settings:
CONFIG_NEUTRON_L3_EXT_BRIDGE=br-ex
CONFIG_NEUTRON_OVS_BRIDGE_MAPPINGS=extnet:br-ex,physnet1:br-eno2
CONFIG_NEUTRON_OVS_BRIDGE_IFACES=br-ex:eno1,br-eno2:eno2
CONFIG_NEUTRON_OVS_BRIDGES_COMPUTE=br-ex,br-eno2
I also specified that extnet and physnet1 use flat networking instead of vxlan or vlan so that instances can communicate with my existing physical network.
In order to install Glance and Cinder on a node separate from the control node, you must enable unsupported parameters as follows:
# Specify 'y' if you want to use unsupported parameters. This should
# be used only if you know what you are doing. Issues caused by using
# unsupported options will not be fixed before the next major release.
# ['y', 'n']
CONFIG_UNSUPPORTED=y
then specify the storage node IP which will host Glance and Cinder:
# (Unsupported!) Server on which to install OpenStack services
# specific to storage servers such as Image or Block Storage services.
CONFIG_STORAGE_HOST=192.168.95.11
It is highly-recommended to define hostnames for each node so that Openstack can refer to nodes without using IP addresses (which can change), but in my test installation I didn't create specify hostnames and IP's in /etc/hosts for each node. Because I simply use IP addresses as identifiers, after the Packstack install is completed, I have to edit /etc/nova/nova.conf on both compute nodes and edit the following setting to use IP address instead of hostname:
vncserver_proxyclient_address=192.168.10.115
Note that the IP address must have an IP in the same subnet as the vnc base url in nova.conf
You can see my entire Openstack Mitaka Packstack answer file for four-node installation at the following link:
https://gist.githubusercontent.com/gojun077/59fbfa56e395853002a65465f91fb691/raw/662fc97ede44d75c02104143909ffe4dda416354/4node-packstack-mitaka.cfg
2016년 9월 10일 토요일
Preparing a Win7 VM for use in Openstack Mitaka
In the project I am currently working on, the client wants to use a variety of OS instances on top of Openstack. Running recent Linux VM's (kernel versions 2.6 and above support the virtio drivers used in Openstack) on Nova just works out of the box, but running Windows VM's on Openstack requires some preparation -- namely, you must first install Redhat's virtio drivers into a Win7 VM and then import the VM image into Glance.
Since I already have a Win7 VM I use for testing in Virtualbox (downloaded legally from Microsoft at modernie), I thought it would be a simple task to just install virtio-win drivers into my Virtualbox Win7 instance. This idea didn't pan out, however.
If you follow the Redhat guide for installing virtio drivers into Windows VM's, your VM needs to have the following System Devices in Device Manager:
Virtualbox by default supports virtio-net network adapter type, but it doesn't support virtio storage devices, memory ballooning, or vioserial, so these virtio
Here is a screenshot of the available System Devices in a Win7 modernie VM running on Virtualbox:

You will notice that the required devices noted above do not exist.
I therefore had to do things the hard way. First I downloaded a Windows 7 installation iso then I created a new KVM virtual machine using virt-manager. The virtual machine has the following devices:
Since I already have a Win7 VM I use for testing in Virtualbox (downloaded legally from Microsoft at modernie), I thought it would be a simple task to just install virtio-win drivers into my Virtualbox Win7 instance. This idea didn't pan out, however.
If you follow the Redhat guide for installing virtio drivers into Windows VM's, your VM needs to have the following System Devices in Device Manager:
- PCI standard RAM Controller (for memory balloon driver)
- PCI Simple Communication Controller (for vioserial driver)
- virtio network (for netKVM driver)
- virtio storage (for viostor driver)
Virtualbox by default supports virtio-net network adapter type, but it doesn't support virtio storage devices, memory ballooning, or vioserial, so these virtio
Here is a screenshot of the available System Devices in a Win7 modernie VM running on Virtualbox:

You will notice that the required devices noted above do not exist.
I therefore had to do things the hard way. First I downloaded a Windows 7 installation iso then I created a new KVM virtual machine using virt-manager. The virtual machine has the following devices:
- 2 IDE CD-ROM's - the first CD-ROM must mount the virtio-win iso file while the second CD-ROM will mount the Windows 7 iso.
- 1 VirtIO hard disk
- 2 VirtIO network adapters (1 for the private subnet, 1 for the public subnet for floating IP's in Openstack)
As of September 2016, you also have to change the video type from QXL to Cirrus, otherwise the VM will get stuck on "Starting Windows". This is a bug in qemu and might have been fixed by the time you read this article.
The Win7 installer will not be able to find any disks (because the disk uses virtio), so when it asks you for the location of the disk, click the install drivers button and select the CD-ROM containing the Redhat virtio drivers for Windows.
I followed this guide for these steps:
Although the guide is for VMWare, it works just as well for KVM. However, the last step about adding the virtio drivers to regedit is not necessary for KVM.
2016년 9월 3일 토요일
pdfshuffler for adding and removing pages from a PDF file
I used to use pdfmod for Linux to concatenate multiple PDF files together or to remove pages from a PDF file. pdfmod has mono libraries (open source MS .NET implementation) as a dependency, however, and they take up over 100 MB on disk when installed.
I have found a nice, lightweight replacement, however. pdfshuffler has just a handful of python dependencies and takes up less than 5 MB on disk. It has all the functionality of pdfmod but is much lighter. It can be found in the default repos on Fedora 24 and in the Arch User Repository. Highly recommended!

Note that you may run into a python bug when running pdfshuffler; you simply need to change ~2 lines of Python source as a workaround:
https://sourceforge.net/p/pdfshuffler/bugs/39/?limit=25#30ad/6f47
2016년 8월 27일 토요일
Finding PID for programs - Why 'pidof foo' is less trustworthy than 'ps -eF | grep foo'
I often use pidof to find the PID of a running program. It works well with dhclient, dnsmasq and other executable binaries. But pidof runs into problems when trying to find the PID of script files that in turn invoke other programs. Take, for example, the Python 2 program deluge-gtk BitTorrent client.
[archjun@pinkS310 bin]$ pidof deluge-gtk
[archjun@pinkS310 bin]$ ps -eF | grep "deluge*" | grep -v grep
archjun 25862 1 3 289160 89272 1 16:47 ? 00:01:30 /usr/bin/python2 /usr/bin/deluge-gtk /MULTIMEDIA/Torrents/CentOS-5.5-x86_64-bin-DVD.torrent
In the first case, pidof fails to return any PID for the deluge-gtk executable file. In the second case, grepping for deluge-gtk in the output of ps -eF (all processes, extra full format) correctly returns the PID of the BitTorrent client which is executed by Python 2.
Let's take a look at the contents of the deluge-gtk executable file:
[archjun@pinkS310 bin]$ cat /usr/bin/deluge-gtk
#!/usr/bin/python2
# EASY-INSTALL-ENTRY-SCRIPT: 'deluge==1.3.13.dev0','gui_scripts','deluge-gtk'
__requires__ = 'deluge==1.3.13.dev0'
import sys
from pkg_resources import load_entry_point
if __name__ == '__main__':
sys.exit(
load_entry_point('deluge==1.3.13.dev0', 'gui_scripts', 'deluge-gtk')()
)
ps -eF is more useful because it can follow an execution chain to the final PID.
피드 구독하기:
글 (Atom)